 In this article we want to deal with the topic of steganography and implement a small example in PHP. Because PHP is not “only” used to create web pages or to implement forms, as any experienced PHP programmer of larger web agencies will surely confirm.
Besides functions for text processing, PHP also provides methods for image processing as well as for manipulation on bit and byte level. And these are the ones we want to use today. But before we start coding, we will have a short introduction to the topic of steganography.
Steganography is not shorthand
As the title already announced, today’s topic is steganography, the art of hiding information or knowledge in a carrier medium. Wikipedia defines steganography as follows:
Steganography (/ˌstɛɡəˈnɒɡrəfi/) is the practice of concealing a message within another message or a physical object. In computing/electronic contexts, a computer file, message, image, or video is concealed within another file, message, image, or video. The word steganography comes from Greek steganographia, which combines the words steganós (στεγανός), meaning “covered or concealed”, and -graphia (γραφή) meaning “writing”.
Quelle: https://en.wikipedia.org/wiki/Steganography
This may sound a bit abstract at first glance, but actually steganography is not that difficult to understand. Let’s assume we are an undercover investigator and have taken a photo of a crime. Now we want to sneak this photo past our enemies without being detected. To do this, we take our secret photo and hide it inside a harmless photo. For example, a beautiful landscape shot.
After we have injected our secret photo into the landscape photo (the carrier medium), it becomes the so-called “steganogram”. The recipients of our steganogram, in turn, use their knowledge of how we hid the photo and read it back out of the landscape shot. That’s it! This is how steganography works in its simplest form.
In our article today, let’s recreate exactly this scenario. We’ll write a small PHP script that will allow us to hide files in a photo and thus create our own steganograms.
A word to end the introduction – even if it sounds similar – steganography is not shorthand. Shorthand is a shorthand consisting of symbols, which allows to make handwritten notes especially fast.
The program flow in theory
![]() The script we want to write today allows to hide images in other images. If you work through the article to the end, you should also be able to extend the script so that any files can be hidden in a photo. But how does this work technically? To do this, we first need to look at how images are stored digitally.
The script we want to write today allows to hide images in other images. If you work through the article to the end, you should also be able to extend the script so that any files can be hidden in a photo. But how does this work technically? To do this, we first need to look at how images are stored digitally.
A digital image consists of a set of pixels. Each pixel in turn has its own color value. These color values/colors are (in most cases) composed of the three primary colors red, green and blue.
Each basic color in turn is represented with a value of 0-255 and thus fits exactly into 1 byte. The higher the value of the primary color, the more dominant it is in the color of the pixel. For example, a pure red consists of: “Red: 255, Green: 0, Blue: 0”. A white pixel, in turn, would be represented as “Red: 255, Green: 255, Blue: 255”.
Now that we have learned the basic structure of an image and how a pixel works, we can use this for our purpose. As an example, let’s take the color red. As described earlier, red is represented as 255, 0, 0 (red, green, blue). Likewise, we have found that the range of values corresponds to 0-255 and fits into 1 byte. Thus, we could also represent the basic color values in binary. (Who needs help can use this calculator here).
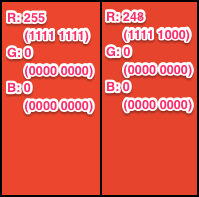 In binary notation, red would be represented as 11111111, 00000000, 00000000. A characteristic of the binary notation is that a change of the bits, the further to the right it takes place, has a smaller and smaller influence on the total value. For example, if you change the last 3 bits in the red value from 111 to 000, the decimal value changes from 255 to 248. This change is barely perceptible to the human eye, as shown in the accompanying graphic, which shows the two colors side by side.
What do we learn from this? So we can adjust at least the last 3 bits of a color value without it being very noticeable. Now let’s think about it further. A pixel consists of three basic color values. If we adjust three bits each, then we can adjust 9 bits in a pixel. So this is enough to encode more than one byte in a single pixel. If we adjust only 2 instead of 3 bits in a color, we get exactly one byte.
So if we have a photo from a standard camera that was taken with a resolution of 12 megapixels, we have an image with 4048 × 3040 = 12,305,920 pixels. In each pixel we can store 1 byte. So with 12,305,920 pixels, we can also store 12,305,920 bytes, which in turn is ~11.75 Mb.
How we now divide one byte of the file to be hidden into 3 bytes (red byte, green byte, blue byte) of each pixel and why we can’t convert the full number of pixels into memory in practice will follow in the next section, where we will look at the implementation.
But before we get started, a word about the carrier medium, the image in which we want to hide our secret photo. The carrier medium must necessarily be in an uncompressed or lossless compressed file format such as PNG, TIFF or BMP. Lossy formats do not work for this steganography method because, as the name suggests, such formats as JPG compress with information loss. In practice, for example, several pixels of similar color are combined into blocks of a single color. So here we would lose information of our secret message.
But now enough of the theory. In the following section we will begin to put the concept we have now learned into practice.
The implementation
For the implementation we will build the script in small pieces and discuss them one by one. If you lose the overview, you can scroll to the end of the article. There you will find the complete script in one block.
//URLs of the carrier medium and the file to be hidden
$src_container = $_GET['img_container'];
$src_payload = $_GET['payload_file'];

//Read out image size and calculate maximum byte size
$container_size = getimagesize($src_container);
$maxPayloadByte = $container_size[0]*$container_size[1]-4;
In the first two lines of code, we request the URLs of the carrier medium and the payload. The URL for the carrier medium should point to a lossless compressed image file. (Such as a PNG graphic.) The URL for the payload can point to any file. (In principle, the files could also be read directly from disk or obtained from other sources. However, for simplicity, we work with URLs that we read in via GET parameters).
In the third line, we use the getimagesize function to determine some values about the carrier medium. Especially interesting are the dimensions (width and height) in pixels of the carrier medium.
In the fourth line we now calculate the maximum file size in bytes that we can store in the carrier medium. To do this, we first calculate the number of pixels by multiplying the width ($container_size[0]) by the height ($container_size[1]). Since we can store one byte in each pixel (see the paragraph “Program flow in theory”), the maximum amount of memory results from the number of pixels.
From this total amount of memory we now subtract 4 bytes (respectively 32 bits). We “reserve” this amount of memory to store the file size of the file to be hidden. If the file size is smaller than the available memory, we have to know how many pixels contain a part of the secret message and how many pixels are no longer part of the message.
//Write payload to byte array and calculate size
$payloadByteArr = unpack("C*", file_get_contents($src_payload));
$payloadByteSize = count($payloadByteArr);

//File size security check
if ($payloadByteSize > $maxPayloadByte)
{
  die('The payload is larger than the cryptcontainer.');
}
In the next step we use the unpack function to read/convert the file to be hidden ($src_payload) into an array of bytes. After that, we then read the size of this byte array ($payloadByteArr) using the count function.
Finally, we check if the maximum file size that can be hidden in the carrier ($maxPayloadByte) is larger than the file to be hidden ($payloadByteSize). If this is not the case, i.e. the secret file does not fit into the carrier medium, we abort the script with an error message and the die command.
If the carrier medium is large enough, we prepare the encoding. For this we create a few auxiliary variables.
//Read carrier medium in file and "open" as image
$container = file_get_contents($src_container);
$img = imagecreatefromstring($container);
if (!$img) echo "error";

//Rewrite payload size to byte array
$payloadByteSizeArr = array((($payloadByteSize >> 24) & 0xFF),
     (($payloadByteSize >> 16) & 0xFF),
     (($payloadByteSize >> 8) & 0xFF),
     ($payloadByteSize & 0xFF) );
First we read the secret file into the variable $container, in order to create an image object ($img) from it in the next step by means of the imagecreatefromstring function. This is necessary to be able to read and change the color values of the individual pixels later. If there is an error, we acknowledge this with the output of a string with the value “error”.
Next we take the size of the payload (=secret file). We have to hide this (together with the secret data itself) in the carrier medium in order to know how many pixels are provided with secret data. However, since the size information is a 32-bit integer in the $payloadByteSize variable, but we can only fit 1 byte in each pixel, we shift each 8-bit (=1 byte) from the integer into a byte using the bitshift operator (>>) and a bitmask (&0xFF) and put it in the $payloadByteSizeArr array.
If you couldn’t follow this section completely, it’s best to read the introduction to bit operators again. Alternatively, feel free to post a comment below this article with your question. I will then do my best to clear up the ambiguities.
Now all the preliminary work is complete. We have determined image sizes, calculated and checked memory sizes, and prepared the data. So let’s move on to encoding the secret message.
To address the pixels of the carrier medium ($img) one by one, we start with two nested loops.
//For each pixel on the horizontal
for($x=0;$x<$container_size[0];$x++)
{
   //For each pixel on the vertical
   for($y=0;$y<$container_size[1];$y++)
   {
      //Treat the first 4 pixels (=bytes) differently
      if ($y < 4 && $x == 0)
      {
         //Codeblock A
      }
      else
      {
         //If payload not yet fully hidden
         if ((($x*$container_size[1])+$y-3) <= $payloadByteSize)
         {
            //Codeblock B
         }
      }
   }
}
Inside the two loops, we then do another if-else query to determine if the current x-y value is one of the first 4 pixels. We do this because we want the first four pixels to have the size information of the secret message ($payloadByteSizeArr) rather than the data of the secret message ($payloadByteArr).
In the else block, that is, if it is not one of the first four pixels, we make another if query that checks if the current pixel, is smaller than the file size of the file to be hidden. With this we make sure that we only manipulate pixels in the carrier medium as long as there are bytes of the file to be hidden.
The actual manipulation of the image takes place at the places //Codeblock A and //Codeblock B, which I left out in the code snippet above to keep the loops clear. But now we want to deal with the two code blocks. Let’s start with codeblock A…
//Encode payload size
$pixel=imagecolorat($img, $x, $y);
$payloadSubBlock1 = ($payloadByteSizeArr[$y] & 0xE0) >> 5;
$payloadSubBlock2 = ($payloadByteSizeArr[$y] & 0x1C) >> 2;
$payloadSubBlock3 = ($payloadByteSizeArr[$y] & 0x3);
$payloadBlock = $payloadSubBlock1 << 16 | $payloadSubBlock2 << 8 | $payloadSubBlock3;
$pixel = ($pixel & 0xF8F8FC) | $payloadBlock;
imagesetpixel($img, $x, $y, $pixel);
In the first line we determine the color of the pixel in the carrier medium ($img) at the position x=$x and y=$y using the imagecolorat function. We store the color value in the variable $pixel. Here the imagecolorat function returns the color value as a 24-bit integer. Each 8 of the 24 bits correspond to one of the three color channels red, blue and green.
In the following three lines we take one byte of the $payloadByteSizeArr array, which specifies the length of the payload to be stored. We now split this byte into three blocks ($payloadSubBlock1..3). For this we use bit masks and the & operator as well as bit shifting.
In the next line we push our three subblocks of the information to be hidden into a 24-bit integer, so that we can merge it with the 24-bit integer from $pixel in the following line. In the last line of the code block, the manipulated color is then written back to the carrier medium using the imagesetpixel function.
Since these lines can be a bit confusing, I have written the following example for “Codeblock A” that uses test data to break down the process once again.
//The pixel at the position x, y has the color green-yellow (R=173,G=255,B=47)
$pixel=imagecolorat($img, $x, $y);
//value of $pixel: 10101101 11111111 00101111

//The byte to be coded is:
//$payloadByteSizeArr[$y] -> 10111010
//The mask reads:  0xE0 -> 11100000
$payloadSubBlock1 = ($payloadByteSizeArr[$y] & 0xE0);
//By use of & the value of $payloadSubBlock1 turns to: 10100000
$payloadSubBlock1 = $payloadSubBlock1 >> 5;
//By use of >> 5 the value of $payloadSubBlock1 turns to: 00000101

//0x1C -> 00011100
$payloadSubBlock2 = ($payloadByteSizeArr[$y] & 0x1C);
//By use of & the value of $payLoadSubBlock2 turns to: 00011000
$payloadSubBlock2 = $payloadSubBlock2 >> 2;
//By use of >> 2 the value of $payloadSubBlock2 turns to: 00000110

//0x3 -> 00000011
$payloadSubBlock3 = ($payloadByteSizeArr[$y] & 0x3);
//By use of & the value of $payloadSubBlock3 turns to: 00000010

//$payloadSubBlock1 << 16 equals: 00000101 00000000 00000000
//$payloadSubBlock2 << 8 equals:  00000000 00000110 00000000
//$payloadSubBlock3 equals:       00000000 00000000 00000010
$payloadBlock = $payloadSubBlock1 << 16 | $payloadSubBlock2 << 8 | $payloadSubBlock3;
//After linking with | operator: 00000101 00000110 00000010

//$pixel value is:   10101101 11111111 00101111
//0xF8F8FC equals: 11111000 11111000 11111100
//($pixel & 0xF8F8FC) equals: 10101000 11111000 00101100
//The mask deletes 3 resp. 2 most irrelevant bits of the respective color channel
$pixel = ($pixel & 0xF8F8FC) | $payloadBlock;
//The | operator connects cleared pixels with $payloadBlock
//$pixel value is: 10101101 11111110 00101110

imagesetpixel($img, $x, $y, $pixel);
//new pixel color was set in carrier medium
That is already the whole magic. Now let’s move on to “Code Block B”…
//Encode payload
$pixel=imagecolorat($img, $x, $y);
$payloadSubBlock1 = ($payloadByteArr[($x*$container_size[1])+$y-3] & 0xE0) >> 5;
$payloadSubBlock2 = ($payloadByteArr[($x*$container_size[1])+$y-3] & 0x1C) >> 2;
$payloadSubBlock3 = ($payloadByteArr[($x*$container_size[1])+$y-3] & 0x3);
$payloadBlock = $payloadSubBlock1 << 16 | $payloadSubBlock2 << 8 | $payloadSubBlock3;
$pixel = ($pixel & 0xF8F8FC) | $payloadBlock;
imagesetpixel($img, $x, $y, $pixel);
What stands out? CodeblockB is similar to CodeblockA except for one small detail. The functionality is completely the same except for the one difference, so I won’t go into further explanation at this point.
The only difference is how the index is calculated at which the byte to be hidden is taken from the $payloadByteArr array.
In code block A we had taken the variable $y at this point. This is no longer possible for the payload, since we have to include the rows $x in addition to the columns. Finally, $y becomes 0 again for each column (each loop pass), which is why we add $x to the index calculation. Finally we reduce the index by 3 positions, because the pixel index ($x, $y) is already advanced by codeblockA, but we want to start at its index 0 for the readout from $payloadByteArr.
The complete script
For the explanation it was certainly helpful to analyze the script in single blocks or line by line. But if you lost the overview, please have a look at the following code block, which shows the complete script in one block.
<?php
//URLs of the carrier medium and the file to be hidden
$src_container = $_GET['img_container'];
$src_payload = $_GET['payload_file'];

//Read out image size and calculate maximum byte size
$container_size = getimagesize($src_container);
$maxPayloadByte = $container_size[0]*$container_size[1]-4;

//Write payload to byte array and calculate size
$payloadByteArr = unpack("C*", file_get_contents($src_payload));
$payloadByteSize = count($payloadByteArr);

//File size security check
if ($payloadByteSize > $maxPayloadByte)
{
    die('The payload is larger than the cryptcontainer.');
}

//Read carrier medium in file and "open" as image
$container = file_get_contents($src_container);
$img = imagecreatefromstring($container);
if (!$img) echo "error";

//Rewrite payload size to byte array
$payloadByteSizeArr = array((($payloadByteSize >> 24) & 0xFF),
                             (($payloadByteSize >> 16) & 0xFF),
                             (($payloadByteSize >> 8) & 0xFF),
                             ($payloadByteSize & 0xFF) );


//For each pixel on the horizontal
for($x=0;$x<$container_size[0];$x++)
{
    //For each pixel on the vertical
    for($y=0;$y<$container_size[1];$y++)
    {
        //Treat the first 4 pixels (=bytes) differently
        if ($y < 4 && $x == 0) {
            //Encode payload size
            $pixel=imagecolorat($img, $x, $y);
            $payloadSubBlock1 = ($payloadByteSizeArr[$y] & 0xE0) >> 5;
            $payloadSubBlock2 = ($payloadByteSizeArr[$y] & 0x1C) >> 2;
            $payloadSubBlock3 = ($payloadByteSizeArr[$y] & 0x3);
            $payloadBlock = $payloadSubBlock1 << 16 | $payloadSubBlock2 << 8 | $payloadSubBlock3;
            $pixel = ($pixel & 0xF8F8FC) | $payloadBlock;
            imagesetpixel($img, $x, $y, $pixel);
        }
        else
        {
            //If payload not yet fully hidden
            if ((($x*$container_size[1])+$y-3) <= $payloadByteSize) {
                //Code payload
                $pixel=imagecolorat($img, $x, $y);
                $payloadSubBlock1 = ($payloadByteArr[($x*$container_size[1])+$y-3] & 0xE0) >> 5;
                $payloadSubBlock2 = ($payloadByteArr[($x*$container_size[1])+$y-3] & 0x1C) >> 2;
                $payloadSubBlock3 = ($payloadByteArr[($x*$container_size[1])+$y-3] & 0x3);
                $payloadBlock = $payloadSubBlock1 << 16 | $payloadSubBlock2 << 8 | $payloadSubBlock3;
                $pixel = ($pixel & 0xF8F8FC) | $payloadBlock; imagesetpixel($img, $x, $y, $pixel);
            }
        }
   }
}
header('Content-type: '.$container_size['mime']);
imagepng($img);
imagedestroy($img);
?>
Let’s come to the conclusion of the article…
The bottom line
First of all, “Hats off and congratulations.” Whoever made it to this point in the article has not only written a working steganography script, but has certainly learned something and once again got the “gray matter” going a bit.
The script in and of itself is actually neither long, nor very complex. Nevertheless, it fascinates (at least me) what is possible with so few lines of code.
The attentive reader may have noticed that we only wrote the script for coding, but none for decoding. However, there is a reason for this. If you really understood the topic, you can write the “reverse script”. And if you don’t understand it, feel free to write me comments until you understand it. If you are only interested in hasty copy’n’paste, you will have to look into the tube today.
For the very diligent still a few ideas for the improvement of the script:
- Analogous to the payload size, the file name of the payload could also be encoded. Thus, the receiver would not necessarily have to know the file format in order to display the decoded message.
- If the payload is smaller than the carrier medium, one could either provide only every xth pixel with payload data or simply change only the last bit of a color channel. This way, the payload could be hidden even more inconspicuously.
- The payload bytes could be encrypted or at least pseudo-randomly arranged before encoding. (This makes it even more difficult to detect by image analysis whether the carrier medium contains a secret file).


I’m still not getting it right for about 3 days ago. I’m having problem from reversing this line
“$pixel = ($pixel & 0xF8F8FC) | $payloadBlock;”
to original $pixel and original $payloadBlock. I have able to resolved $payloadBlock back to $payloadByteSizeArr using
$bc1 = (($pixel >> 16) & 0xFF) >> 5;
$bc2 = (($pixel >> 8) & 0xFF) >> 2;
$bc3 = (($pixel) & 0xFF);
$block = $bc1 | $bc2 | $bc3;
But to get rid of the and logical operator $pixel = ($pixel & 0xF8F8FC) | $payloadBlock; is where the problem is
Can I get the decoding algorithm
Great work, Infact I learned alot but I have been trying to write the decode but I don’t get it right.
Can you please guide me through.
At which point do you got stuck? Feel free to share your script (e.g. via https://gist.github.com/discover or paste in.com ) and I’ll have a look or give you some advice.
OK
I will do write now
// This is where I stock, I was tryiing to retrived the file size from the first 4 byte
public function decodeStego(){
$cover = public_path(‘stego/1648276817’);
$src_container = $cover;
$container_size = getimagesize($src_container);
$container = file_get_contents($src_container);
// return print_r($container);
$img = imagecreatefromstring($container);
$maxPayloadByte = $container_size[0]*$container_size[1]-4;
$mypixel =$block = $block1=$block2=$block3 =$yd=$b =$b1=$b2=$b3= $xd = $pixel1= $xy3=[];
//For each pixel on the horizontal
for($x=0;$x<$container_size[0];$x++)
{
//For each pixel on the vertical
for($y=0; $y<$container_size[1] ;$y++)
{
if ($y < 4 && $x == 0) {
//Encode payload size
// echo "Y = $y and X = $x”;
$pixel=imagecolorat($img, $x, $y);
// echo “Pixel Init $pixel”;
// $pixel = ($pixel & 0xF8F8FC);
// echo “Pixel mani = $pixel”;
$bc1 = (($pixel >>16) & 0xFF);// >> 5;
$bc2 = (($pixel >>8) & 0xFF) >> 2;
$bc3 = (($pixel) & 0xFF);
$block = $bc1|$bc2|$bc3;
// echo “Pixel = $pixel”;
// return $pixel;
echo “B1 = $bc1B2 = $bc2 B3 = $bc3 B = $block”;
}else{
}
}
}
}