For several days I am successfully upgraded to Windows 10. Contrary to the experience of some of my family members and friends, who got black screens or even a total failure while updating to Windows 10, my upgrade proceeded extreme smothly. And as much Windows 10 inspires me with it’s new features, there still remains a vexed issue. How to install unsigned drivers under Windows 10? (For Windows 8 and 8.1, I had already written a guide.) Since the release of Windows 10, a few steps in the click sequence have changed, so there is this follow-up article now, which describes how to install unsigned drivers on Windows 10. And here’s how you do!
Install unsigned drivers with Windows 10
In general there are two approaches to install unsigned drivers in Windows 10. Either you enable the test mode in Windows or you restart the computer in a certain mode. I will put the test mode alternative on the sidelines for this article, as it has the unpleasant peculiarity, that after activation of the test mode, a label “test mode” and some other information remain permanently on the Desktop. Therefore we want to take a closer look at the “traceless” variant by restarting.
Step 1:

First, the compter must be restarted into the so-called “options menu”. The easiest way to get there is via the “Run”-dialog, which is opened by means of the key combination Win+R. The command you have to enter, to boot into the Options menu is as follows:
shutdown.exe /r /o /f /t 00
No products found.
Caution: This command starts the reboot process immediately! No ifs, no buts! If you still have programs open, save everything from the stuff you want to save, before you execute the command.Because nobody likes to executes commands, he does not know, you’ll find the explanation of the individual parameters below:
- shutdown.exe – It’s a Command-Line application which is inclusive with Windows. It does various kinds of restarts and shutdowns.
- /r – means “restart”
- /o – means “the PC should start in the Option menu”
- /f – means “restart directly and close all opened programs immediately”
- /t 00 – shows the time until the restart happens (in seconds). In this case 0 seconds, which equals an immediate restart
Step 2:

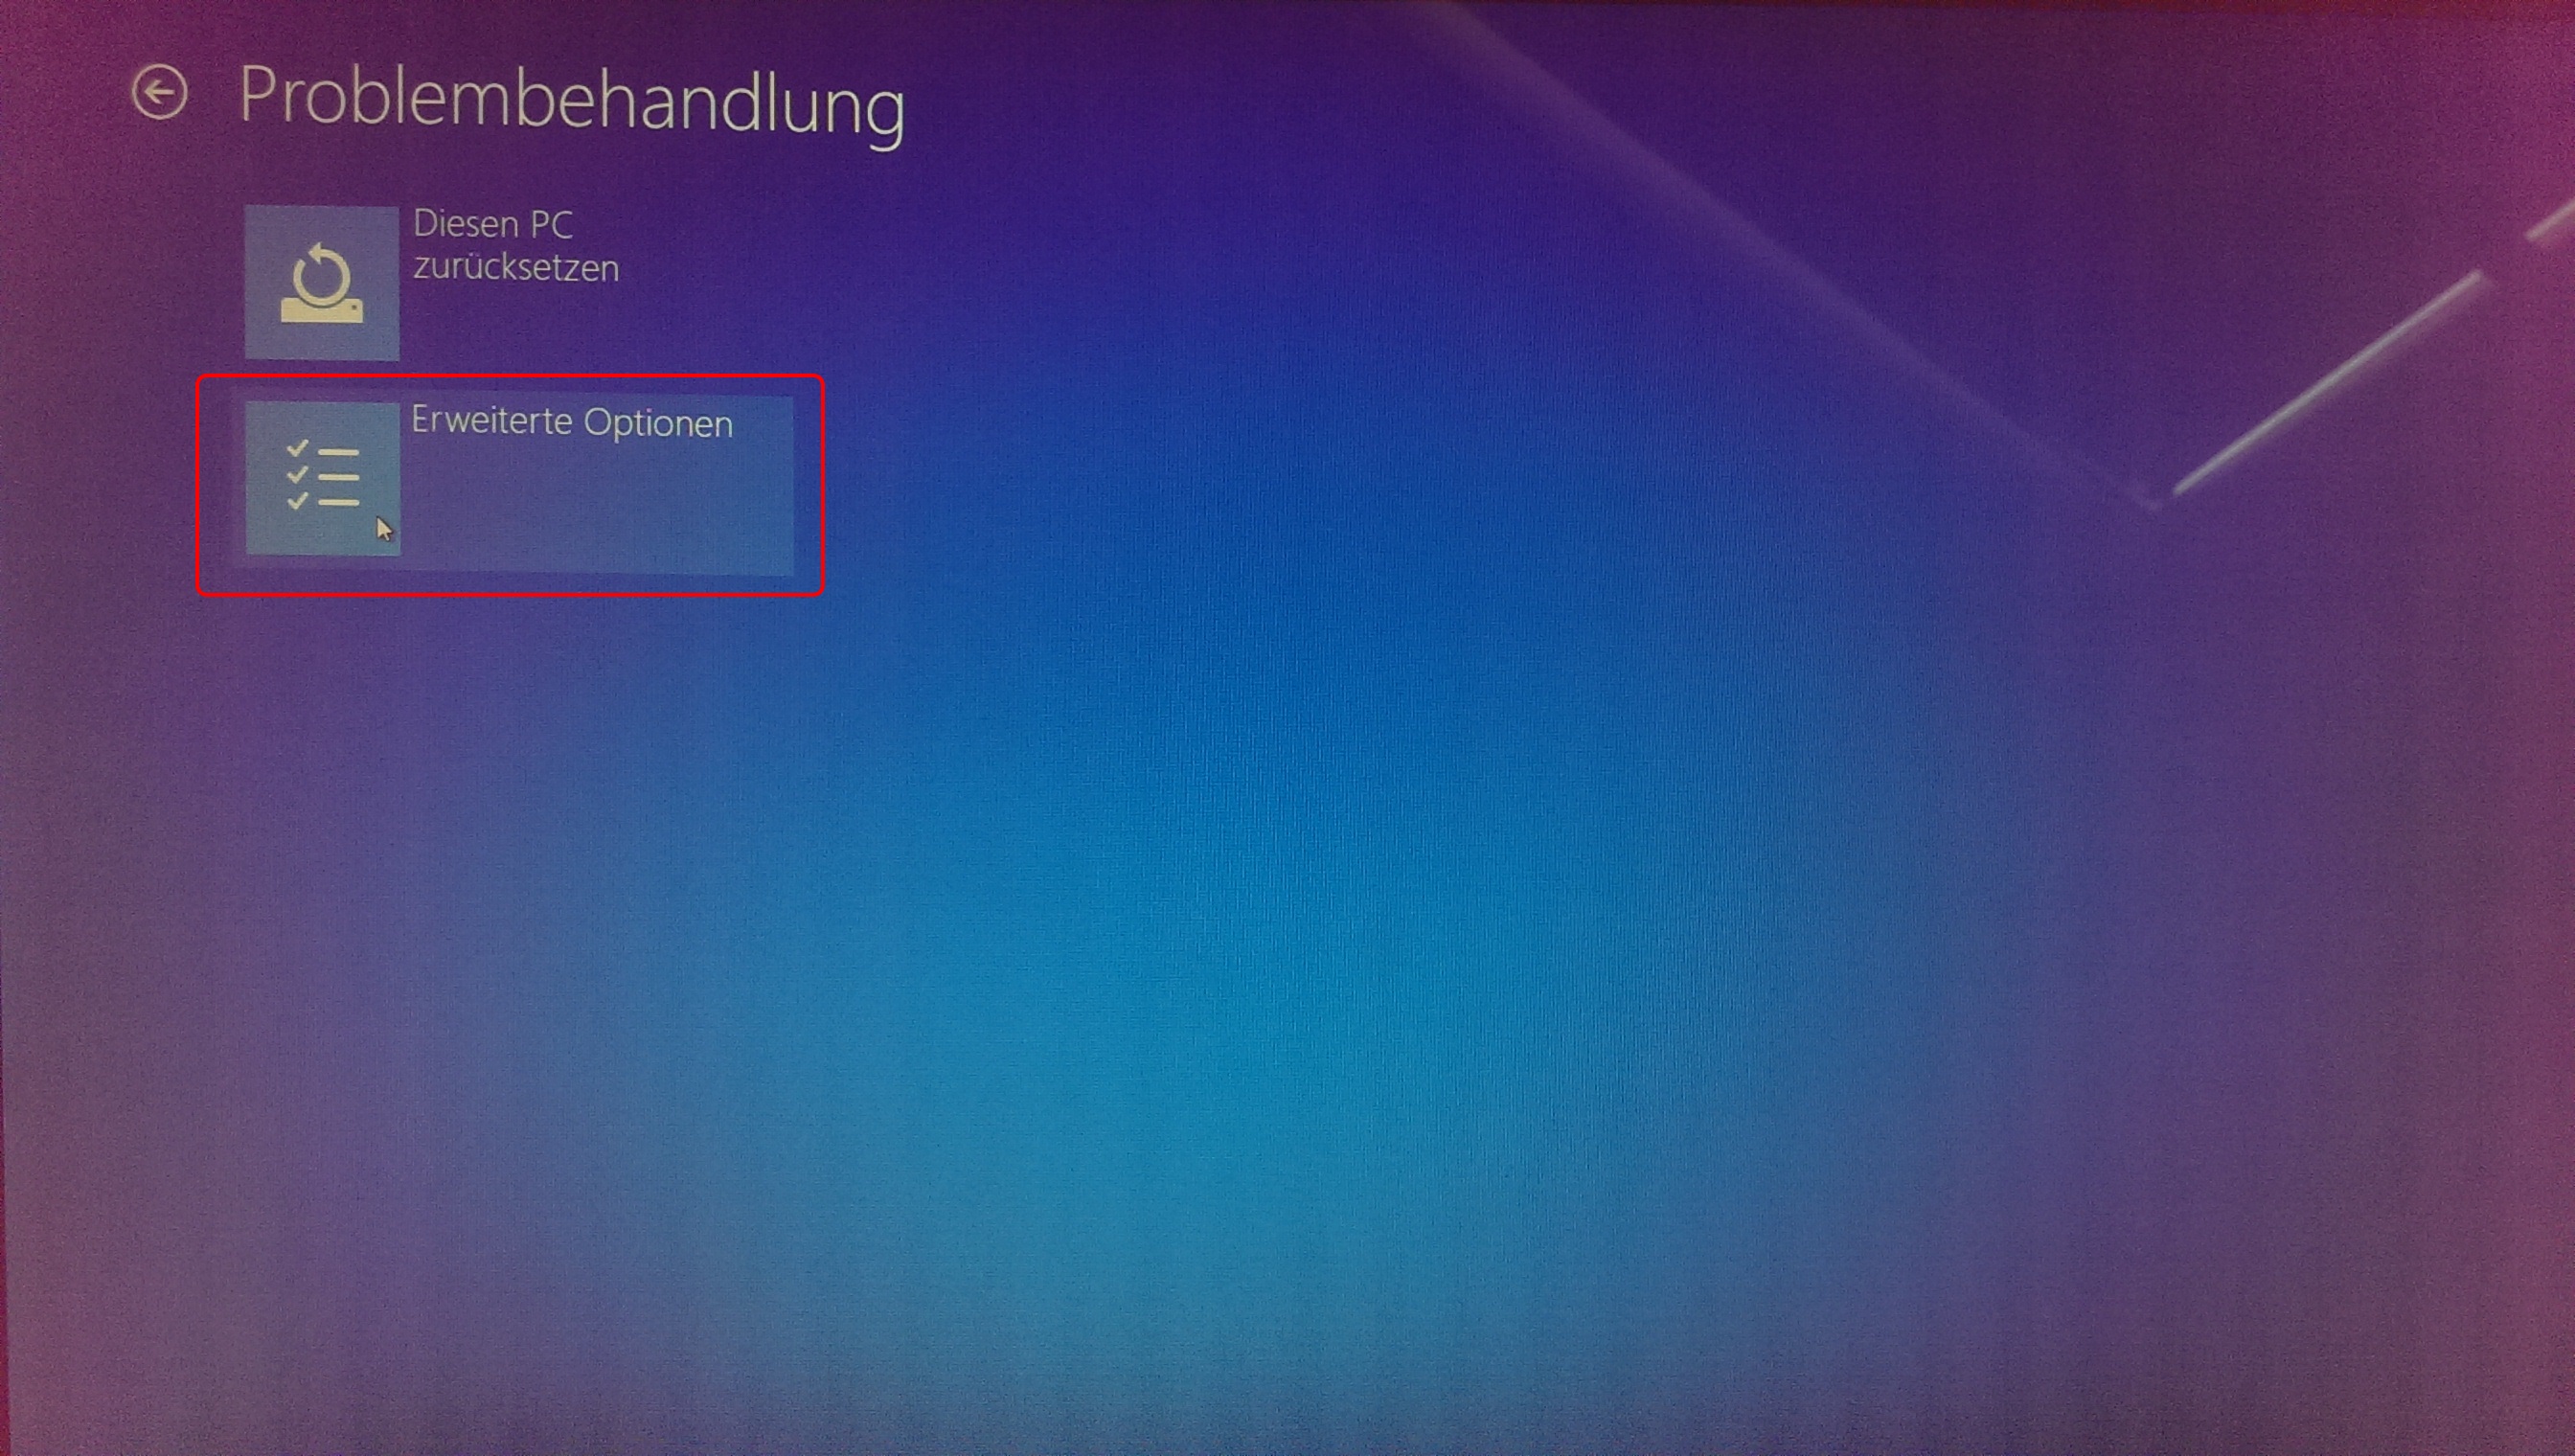
After you have successfully rebooted into the “Options menu”, click “Troubleshoot” and then “Advanced options”.
Step 3:

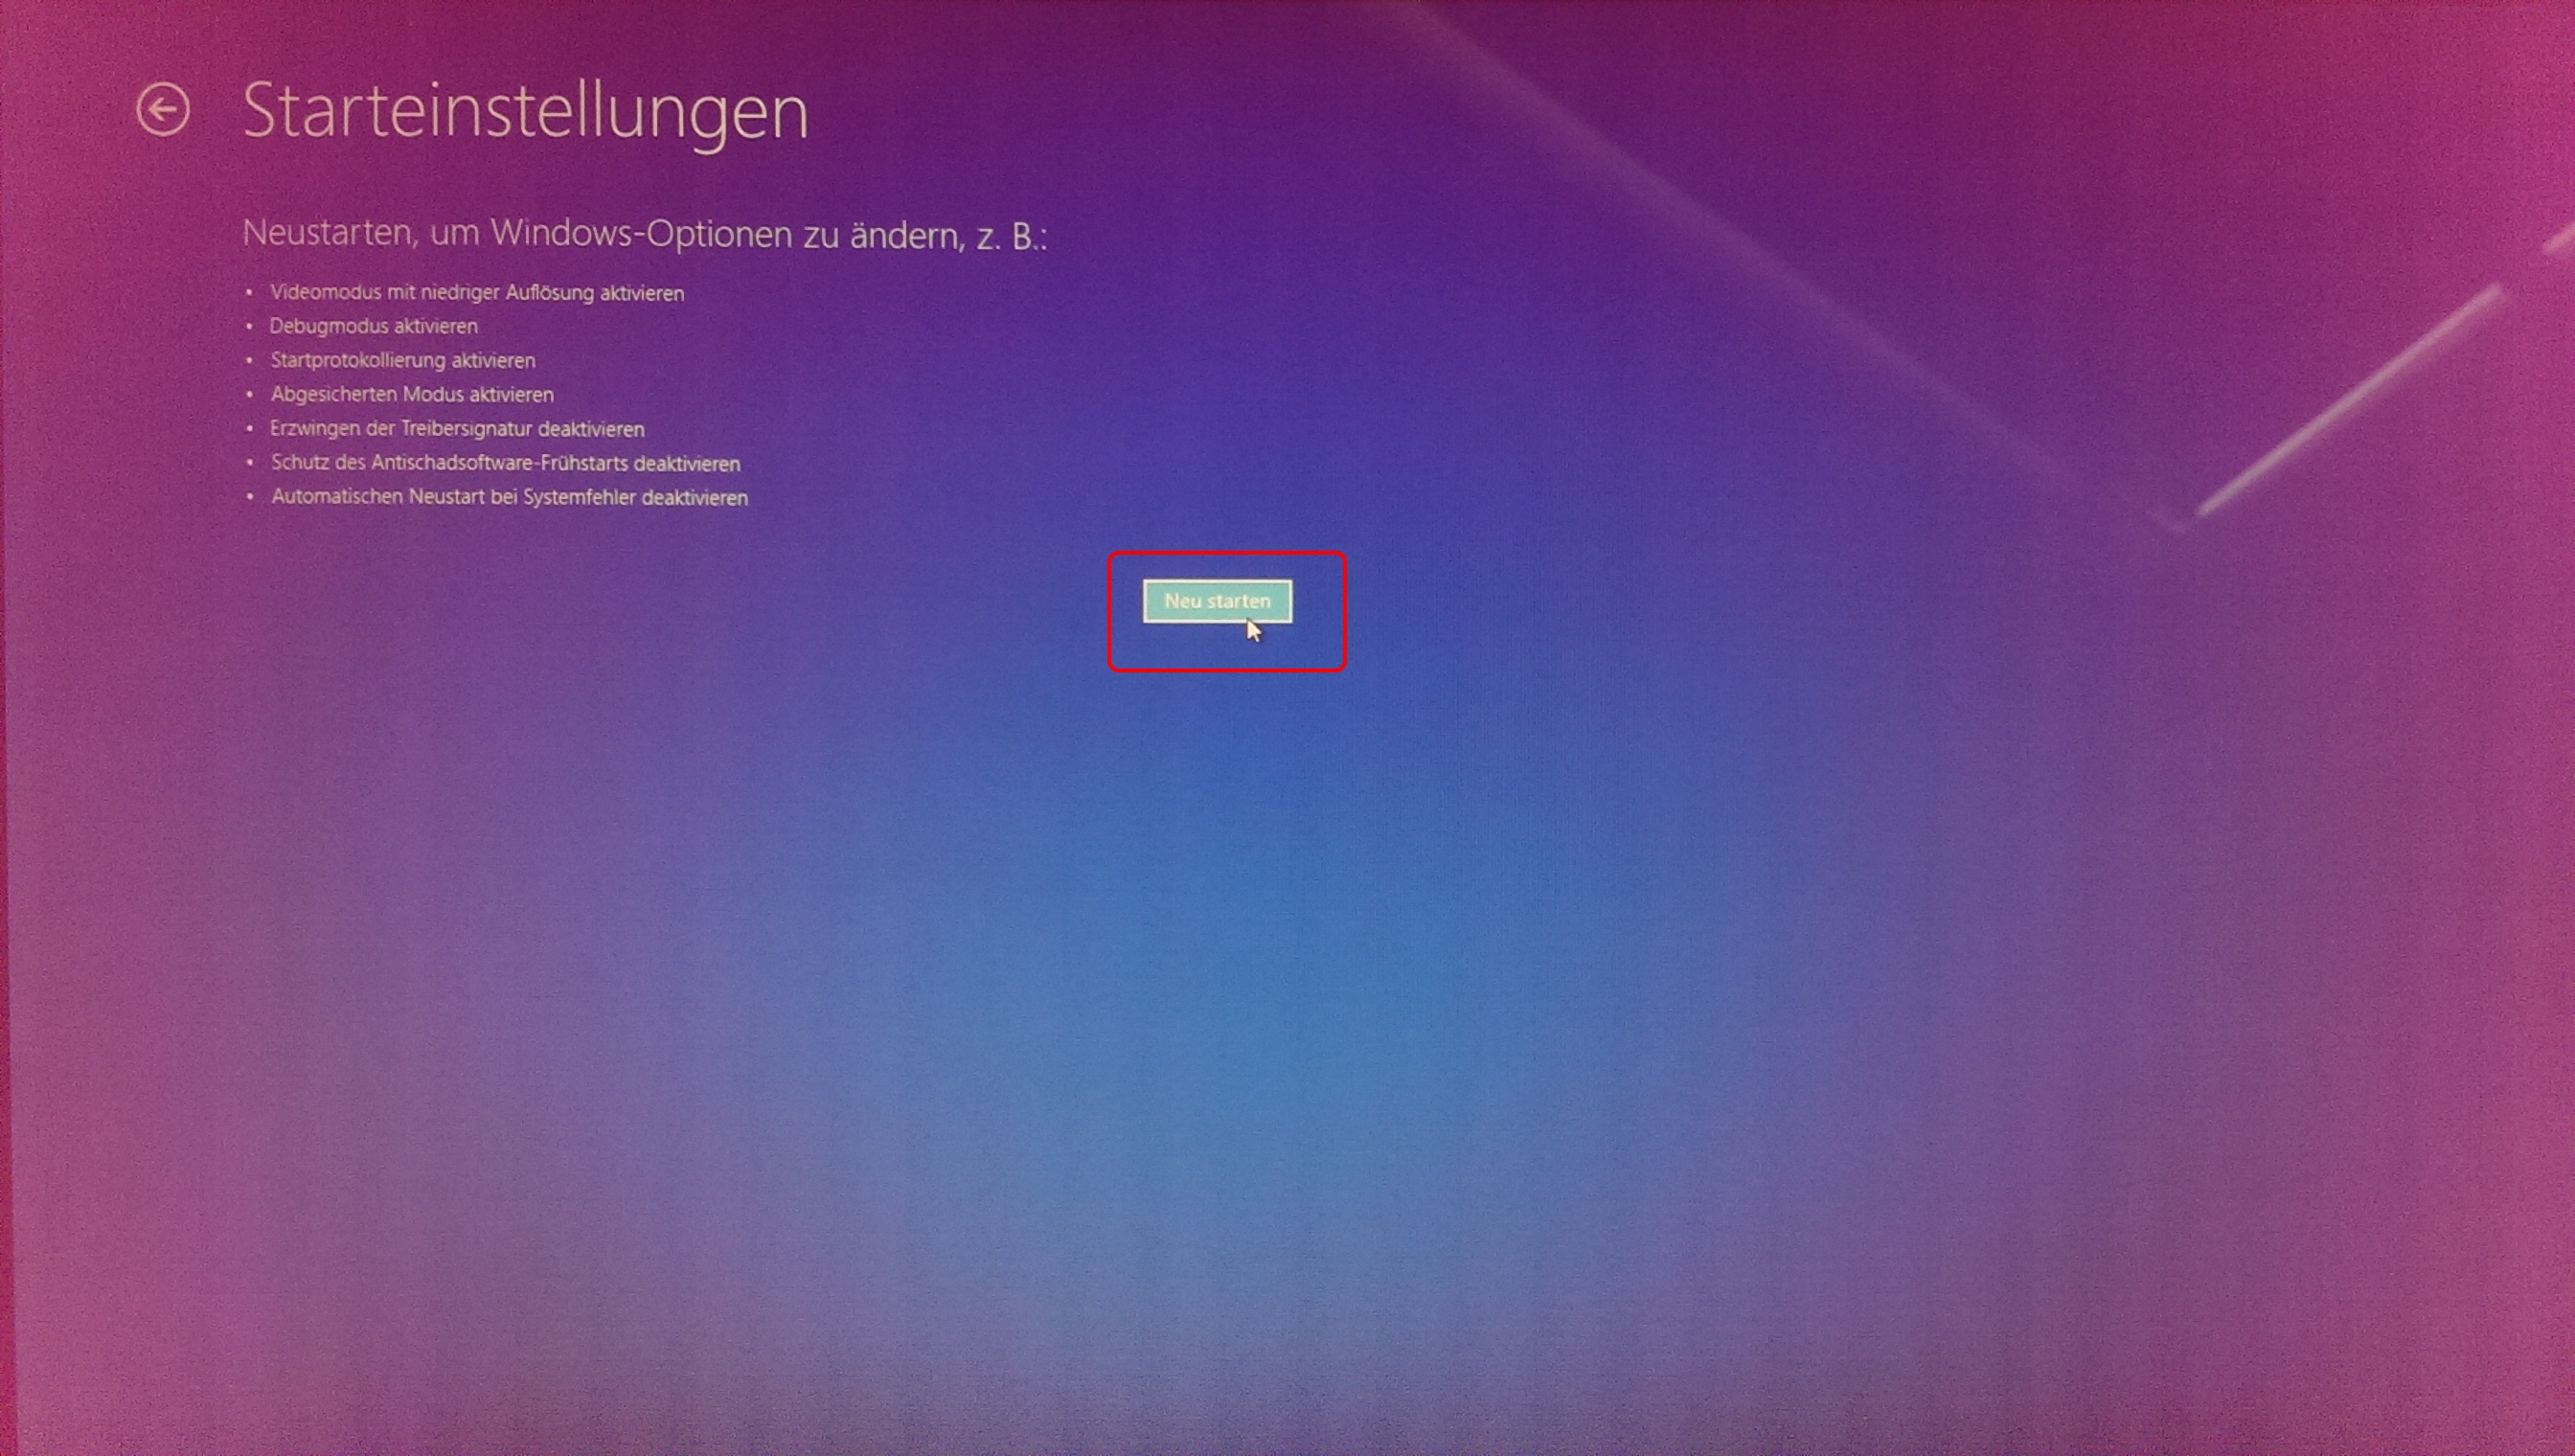
Now click on the “startup settings”-button and the press “reboot”.
Step 4:
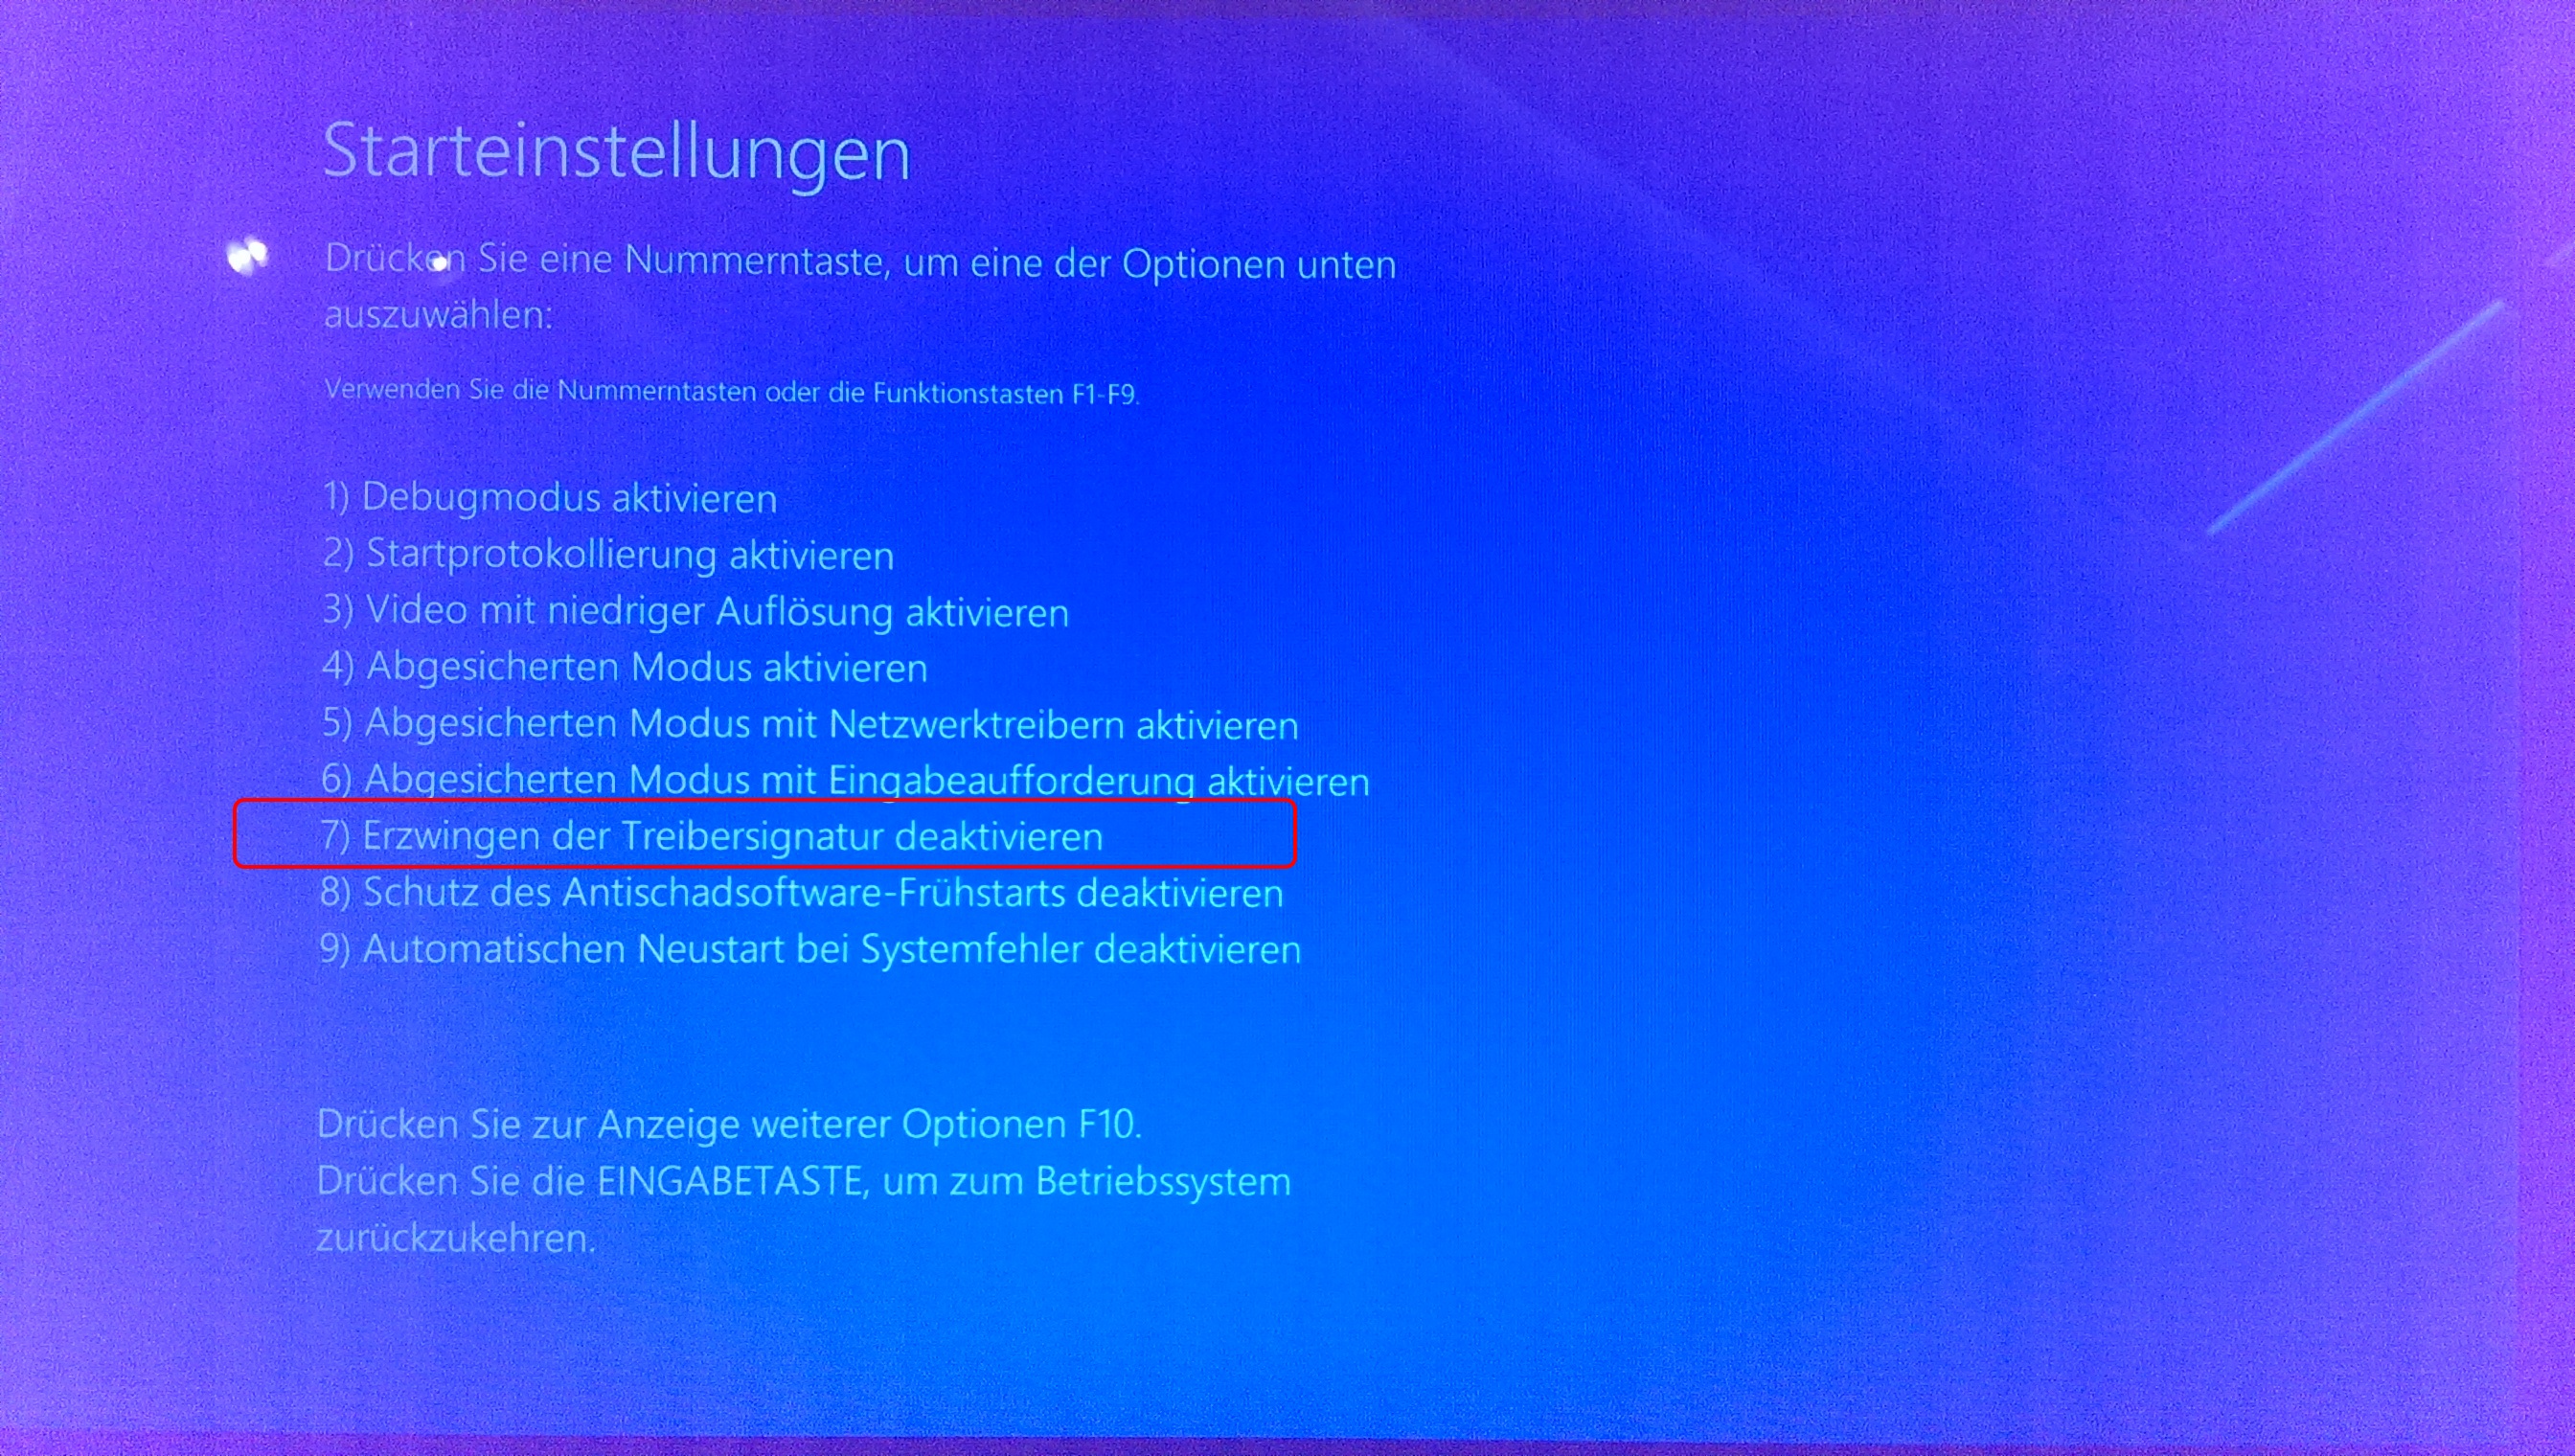
After another reboot, you’re at the startup settings page. Here you can choose between various options, which can be entered by pressing the respective number key. For our needs, you have to click option 7 – “Disable driver signature enforcement”. This deactivates the driver check and enables you to install unsigned drivers in Windows 10.
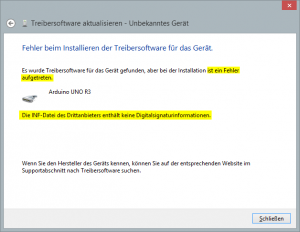
Step 5:
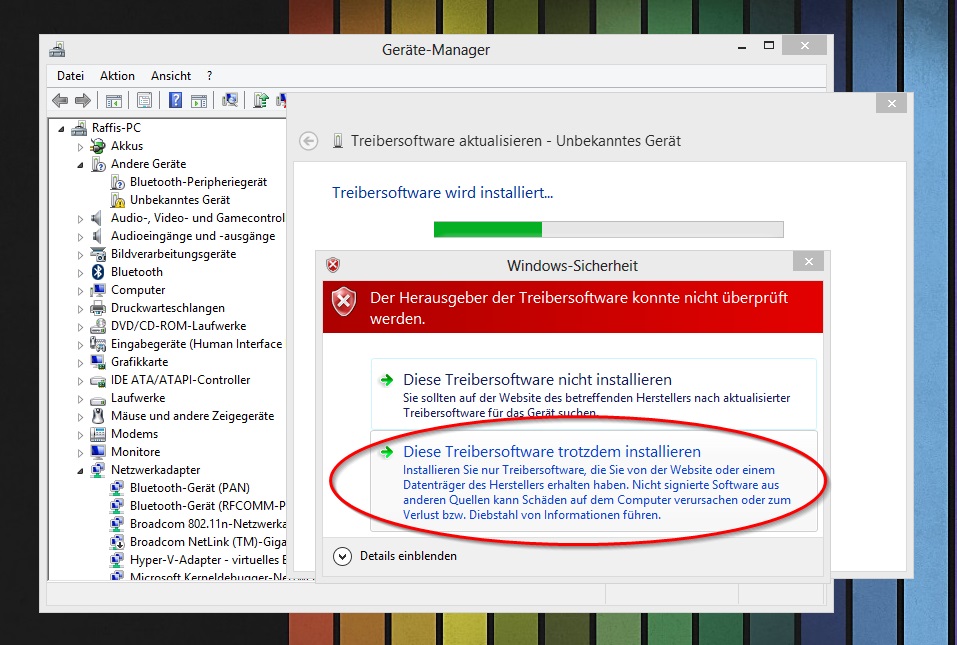
In the last step and after another restart, you are able to install unsigned drivers by using Windows “Device Manager”. Don’t get confused. There still will be a question in the beginning, as you can see in the screenshot above, but nevertheless the installation of the driver will be possible without problems.
One last advice:
Please keep in mind that the functionality of Microsoft’s signed drivers was implemented for a special reason. A bad or broken driver can cause instability and dysfunction of your system. Therefore only install unsigned drivers, if you know the source and/or the publisher and if you are able to evaluate the risk. If you want to be on the “safe side”, simply set an system restore point.
irvingbeauregard@zoho.com
boristuckfield@yahoo.com
earnestineyee@gmail.com
I have used the opp 7 approach to unsigned drivers. the unsigned drivers work perfectly. then I reboot……….the unsigned drivers are disabled!!! I don’t wont to have to use opp 7 every time I boot my computer. is there a way to keep the drivers alive after a normal boot?? please help. thank you.
You can reboot into the options menu by shift-clicking the restart button.
After I originally left a comment I seem to have clicked the -Notify me when new comments are added- checkbox and now every time a comment is added I get 4 emails with the same comment. Perhaps there is a way you can remove me from that service? Appreciate it!
I removed you from the notifications. (For the next time – you could have done this by yourself. Just right above the “comment”-button is a link, which enables you to manage your notifications/subscriptions.)
If you have bitLocker, susoend it before doing this, it gets angry and wants the recovery key..
Worked like a charm
You can use a program called easyBCD “its free”.
In the advanced setting you just have to check a box and windows10 boots with driver signing turned off. Hope this is of some help , it worked fine on win10 for me.
Thanks, it’s work. Install driver and execute easyBCD. When program is executed driver works perfectly! Thks!
First of all, I’d like to add there is an important detail missing in your article. It applies to the 64 bits versions of Windows 10. The 32 bits versions of Windows 10 DO NOT have digital signature enforcement so they wouldn’t have this type of problem.
I tried your proposed solution and it works fine to a certain point. I don’t know if the Nov 2015 update of Windows 10 64 bits changed or broke anything, but what I do know is that this isn’t working as expected.
The specific case: HP DV6000 with Conexant High Definition SmartAudio 221. We may install the driver available from the HP website (which works 100% fine and is totally compatible but does NOT have a valid digital signature). Upon reboot, Windows blocks the driver because it doesn’t have a valid signature.
I tried the procedure described above. The difference is when you are installing the drivers for the device with digital signature enforcement disabled, you never get that RED warning you show here. The driver installs normally without warnings. After installation, audio works perfectly fine.
In a perfect world, and according to what you say, Windows 10 should “remember” that this driver was installed with signature enforcement disabled and should exclude it from further examination after rebooting. However, that’s not what happens.
As soon as you reboot the computer and boot up normally, Windows 10 will verify the signature compliance of this driver AGAIN (it shouldn’t, but it does). It finds the driver doesn’t have a digital signature and gets blocked, yet again.
This “Unsigned drivers are used by windows forcefully as they ask for the signatures requirements for the NEW drivers.” DOES NOT apply anymore. At least, not in this case.
Windows 10 doesn’t forcefully use the unsigned driver. It complains about it and blocks it AS IF it was a “new” driver. Whatever we did with enforcement disabled is ignored by Windows 10.
I don’t know why that happens but Windows 10 is not behaving in the expected way.
The only solution was to use a generic Microsoft High Definition Audio driver that is digitally signed and that one Windows 10 liked. But, that is cheating the system and there was NO reason why Windows 10 wouldn’t want to use the “forcefully installed” driver, specially if it works fine, no blue screens or errors of any sort and the only “problem” is that it doesn’t have a digital signature.
I’ve encountered this exact scenario, and was wondering if you could supply me a link to the generic “Microsoft High Definition Audio” driver you wrote about.
That’s the problem for me too. Have you found workaround for this?
When you have finished installing the unsigned drivers, the computer is needed to be rebooted. Unsigned drivers are used by windows forcefully as they ask for the signatures requirements for the new drivers.