 In today’s article, we’ll look at how to push notifications out of C# onto smartphones or other devices. It does not matter if it is an Android or an Apple / iOS device. But when do you need such functionality?
For example, I run a few niche sites (affiliate websites) with which I earn monthly through affiliate programs. However, the revenue reports have to be picked up proactively in almost all affiliate programs. So I wrote a small C# client, which regularly downloads the reports and sends me a push notification for new sales. That’s just one of many uses and I’m sure you’ll think of a few more. But now back to the topic.
Selection of push platform
For a quick and easy integration of the push functionality in C#, we use a third-party service that provides the infrastructure as well as the apps for Android and iOS. Meanwhile, there are quite a lot of services for such. Pushover, Pusher, OneSignal or Pushbullet to name only a few. My personal favorite (and therefore also the service for our example today) is Pushbullet, as it has worked for me for many years without any problems and even the free version comes nearly without restrictions.


The clients to receive push messages can be found in the respective app stores. Even for Chrome there is an extension, so you can also receive your push messages on the PC.
After you’ve installed the right app on at least one device (without this, the rest of the article makes no sense), you should, if not already done, create a free account on pushbullet.com.
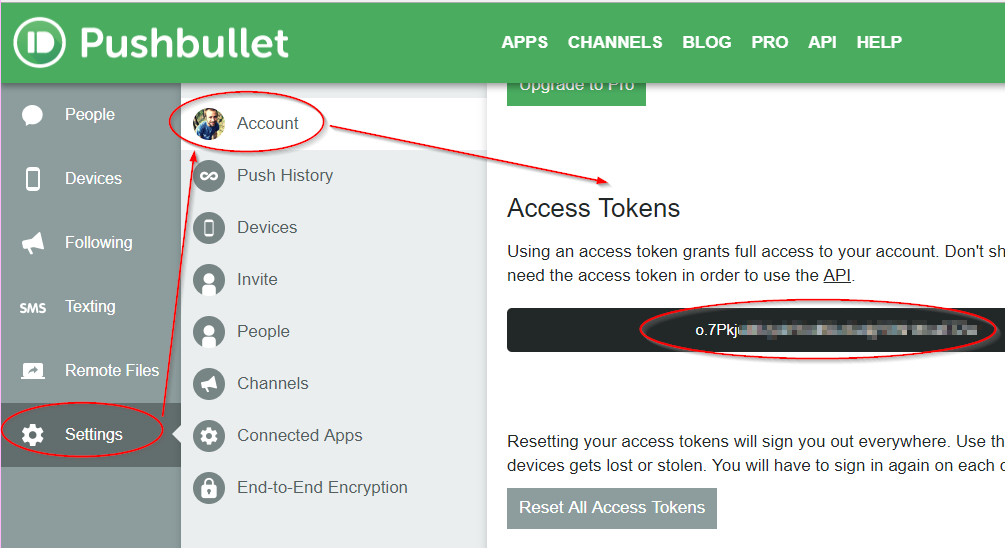 Before we start coding, we still need the API key, the key with which we want to address the Pushbullet API right away. Log in to the Pushbullet website, click on the menu item “Settings”, then “Account” and scroll to the section “Access Tokens”. If there is no token yet, click on the “Create Token” button. The key you create is best copied to a password manager or to a secure location. The adjacent screenshot shows the whole procedure again.
Implementation in C #
Let’s get to the exciting part – the implementation / the coding in C#. For this we create a new project in Visual Studio. Whether you choose Console, WinForms or WPF does not matter.
 After creating the project, we add a library that makes the Pushbullet API easy to program. The library with the name PushbulletSharp can be integrated via NuGet. Click with the right mouse button on the item “References” in the Solution Explorer and select the menu item “Manage NuGet packages”.
In the NuGet package manager you search for “PushBulletSharp” and install the package with a click on the small download arrow. If you would like to know more about the library, you can find the source code here on Github.
First, we add the following using directives to the top of our code file to use the classes of NuGet packages.
using PushbulletSharp;
using PushbulletSharp.Models.Requests;
using PushbulletSharp.Models.Responses;
Now let’s send a simple push message to ourselves. To do that we first have to instantiate the pushbullet class. Then we create an object of the class “PushNoteRequest”, set subject, recipient and message text and send it with the “PushNote” function of the client.
//Create client
var apiKey = "<AccessToken from Account-Page>";
PushbulletClient client = new PushbulletClient(apiKey);

//Get information about the user account behind the API key
var currentUserInformation = client.CurrentUsersInformation();

//Check if useraccount data could be retrieved
if (currentUserInformation != null)
{
     //Create request
     PushNoteRequest request = new PushNoteRequest
     {
        Email = currentUserInformation.Email,
        Title = "This is the headline",
        Body = "Here comes the text."
     };

     PushResponse response = client.PushNote(request);
}
The code shown above has only one downside. If we have Pushbullet installed on multiple devices (for example on two smartphones or on the smartphone and a PC), then all devices receive the messages. For this reason, you can specify devices instead of the email address of the Pushbullet account.
However, therefore you need the ID (in Pushbullet language “iden”) of the device which you would like to send the notifications to. Thankfully, PushBulletSharp also delivers the right function: CurrentUsersDevices(). This gives information about all devices connected to the Pushbullet account.
So either you set a breakpoint during execution and select the appropriate device ID (iden) from the “devices” variable or you select via code from the devices list. In the following example we choose the second option and send the push notifications to all Android devices.
//Create client
var apiKey = "<AccessToken>";
PushbulletClient client = new PushbulletClient(apiKey);

//Fetch device information from account
var devices = client.CurrentUsersDevices();

//Select all Android devices
var targetDevices = devices.Devices.Where(o => o.Type == "Android");

//Send notification to each Android device
foreach (var device in targetDevices)
{
    PushNoteRequest request = new PushNoteRequest
    {
        DeviceIden = device.Iden,
        Title = "For the androids",
        Body = $"Message for: {device.Model}"
    };

    PushResponse response = client.PushNote(request);
}
Now that we can successfully send messages, we look at the next topic: Channels.
Special case: Channels
Both examples shown above have one thing in common. The push messages arrive “anonymously” on the devices. You can see the title and content of the message, but not the sender directly. This can be avoided with channels. A channel has its own name and logo and can be subscribed to by any number of Pushbullet accounts.
Now, when we create a channel, give it an icon, and subscribe to it, we get push messages that tell us where they belong at first glance. For example, I created a “Dobby the elf”-channel, which sends me push messages when the washing machine is ready. Since channels are subscribable, your wife / girlfriend / WG roommates could subscribe to the channel with their Pushbullet account and get informed too about the washing machine’s state.
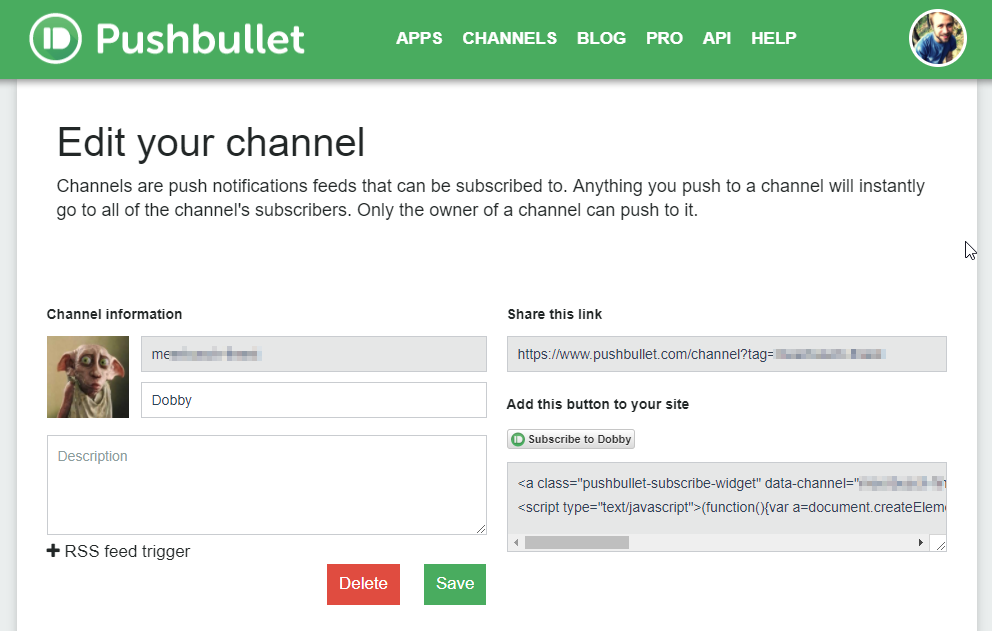
A new channel can be created via the “My Channel” area. The channel picture can be set by clicking on the gray icon. The “Channel Name”-field is the displayed name of the channel. The field “#tag” must be given a unique name/key. After creating the channel, you can subscribe to it by clicking on the button on the right side.
Let’s go to the coding now. To send a message to a channel, we just need to adjust our coding slightly. Instead of the device identifier (iden) or the e-mail address, we now specify the channel tag (#tag-field in the channel editor) as the recipient.
//Create client
var apiKey = "<AccessToken>";
PushbulletClient client = new PushbulletClient(apiKey);

//Create channel request
PushNoteRequest request = new PushNoteRequest
{
    ChannelTag = "<channel-tag-from-channel-config-page>",
    Title = "Dobby says...",
    Body = "...the laundry is ready, Sir!"
};

PushResponse response = client.PushNote(request);


Makale için teşekkürler. Tüm android cihazlara gönderme işlemi haricinde diğer tüm işlemler çalışıyor. Peki dosya gönderme işlemini nasıl yapabiliriz?