 Today there is again an article on Android. More specifically, it’s about how you can run Android and Ubuntu (Linux) in parallel on your smartphone or tablet. Although I had already blogged about it before, but today I want to explain the whole setup process, step-by-step (using a slightly different method).
The title of this article is actually not quite correct, because we will not install Ubuntu, but setup some kind of a live system – so we get down to business.
I used my Galaxy S2 for the project. If it works with other smartphones, I could not test, but would be happy about comments on your part, if you tried it.
For our purposes we need the following things / conditions:
- Android based device with root rights
- Android Terminal Emulator (freely available on Google Playstore)
- android-vnc-viewer (freely available on Google Playstore)
- A special Ubuntu Image
- Shell script for starting the Ubuntu system
The two apps you can find in Google Play or you just click on the names of the apps in the list above. The shell script and the Ubuntu image you can download either from Google Docs or directly from my server.
Download from Google Docs:
- ubuntu.part1.rar (900 MB)
- ubuntu.part2.rar (572 MB)
Download from code-bude.net:
- ubuntu.part1.rar (900 MB)
- ubuntu.part2.rar (572 MB)
If you have downloaded everything, extract the two .rar-archives and then you can start already.
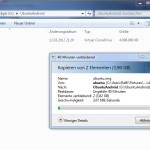
Copy the two files from the archive (ubuntu.img and ubuntu.sh) on your Galaxy S2. I have created a folder called “ubuntu” on the SD card for that purpose. But basically you are free to choose the folder name.
When you are finished copying, you open the terminal emulator app and give in the following commands.
su
cd /sdcard/external_sd/ubuntu/
sh ubuntu.sh
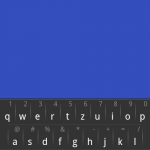 For all those buzzing now a big question mark over his head, I briefly explain the commands. With the “su” command we get the system administration rights.
With “cd” we go to the folder that we have specified after “cd”. If you have chosen a different path for the files from the archive, then of course you have to specify your own path at this point. Then with “sh” we run the shell script “ubuntu.sh”.
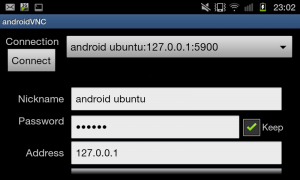
Let’s go on. After you have typed the three commands, Ubuntu starts already. In order to see something now, we need the android-vnc-viewer app. Minimize (not close) the terminal app and open the VNC Viewer.
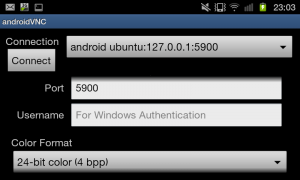
Give the following details:
Password: ubuntu
Address: 127.0.0.1
Port: 5900
Color Format: 24 Bit
Now, when you click “Connect”, you are ready. You can now work with your new Ubuntu system. If you want to quit the whole spook again, shutdown Ubuntu via the Start menu, then disconnected the VNC Viewer (Android menu button -> Disconnect) and open again the terminal emulator and close the terminal window at the end (Android menu button -> close window ).
If you need more details or want to see a live demo, watch one (or both) of the two following videos I made for you:
I hope you had fun reading and watching the videos. If you have questions or have any tips, just write me a comment.



hum nevermind, second link works
..subscribing to comments..
Hi, the links to the Ubuntu image are dead, any chance of providing new sources for it?
Second set of Links to Ubuntu download work now as I dnloaded the second rar file a few minutes ago.
If that doesn’t work…. type linuxonandroid and download there.
Happy dual booting.
Hello,
Thank you for this valuable info.
I’ve been trying to get this to run on a rooted Moto Atrix 4G, 1GB Ram, Dual Core with 8GB free on ext-sd for a month.
I place ubuntu.img on root of ext-sd card with the ubuntu.sh file
Do the su Enter
cd /sdcard/external_sd/ubuntu/ Enter
sh ubuntu.sh Enter
Get . . . Can’t open ubuntu.sh
I’ve tried and tried.
I really need this to work as I think Android is to limited to really do any computing in the real sense.
Well thank you again for this site!