![]() Once we have clarified in this article how to set up a the DynDNS (Dynamic DNS) service for your domains rented at Namecheap.com, we will have to focus on how keep the IP/DNS records for each DynDNS domain up to date.
Once we have clarified in this article how to set up a the DynDNS (Dynamic DNS) service for your domains rented at Namecheap.com, we will have to focus on how keep the IP/DNS records for each DynDNS domain up to date.
In another article I have explained how to do this using a Fritzbox. As for me, I have not only my Fritzbox 24/7 connected to the internet, but also my Raspberry Pi. So I will show you how to setup your Raspberry Pi to use it as a DynDNS client for use with Namecheap.
How to use Namecheap DynDNS service with ddclient on the Raspberry
Log into your Raspberry Pi (by ssh for example) or open a terminal window if you are working directly on Pi. In the first step we have to install ddclient, a DynDNS software, on the Pi. For this purpose, the following two commands are necessary.
sudo apt-get update
sudo apt-get install ddclient
Note: During installation an installation wizard opens and wants to know some things from you. Here you can safely enter what you want, because we have to adjust the configuration file manually either way, because the wizard does not support the Namecheap.com interface.
Customizing the ddclient configuration
After we have installed ddclient, we must now adjust its configuration file. The path of the file is:
/etc/ddclient.conf
Open the config file using any text editor. (I prefer nano.)
sudo nano /etc/ddclient.conf
Now you have to replace the file’s contents and adapt with the following content:
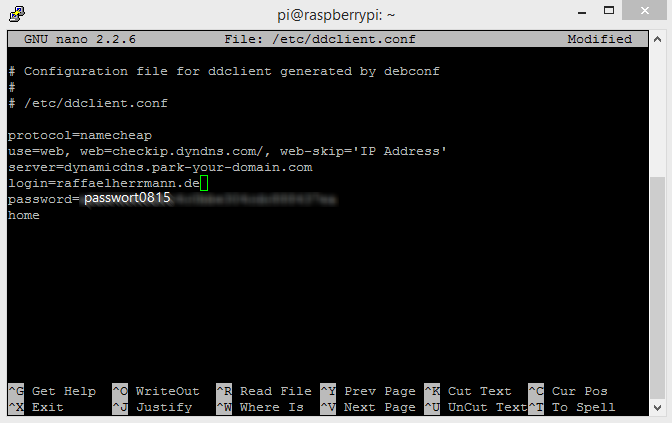
# Configuration file for ddclient generated by debconf
#
# /etc/ddclient.conf

protocol=namecheap
use=web, web=checkip.dyndns.com/, web-skip='IP Adress'
server=dynamicdns.park-your-domain.com
login=<yourdomain.com>
password=<your namecheap dyndns password>
<your subdomain>
- <yourdomain.com> must be replaced by the domain name, which you want to update.
- <your namecheap dyndns password> is the password that you have received from the instructions in the previous article.
- <your subdomain> is the subdomain you want to update. If you want to upgrade your main domain, you must enter here a “@” (without the quotation marks).
Below is a screenshot of my config with the data from the last article. The domain was “raffaelherrmann.de”, the subdomain was “home” and the password (for example) “passwort0815”.

Here is the error message :
SSL connect attempt failed with unknown error error:14090086:SSL routines:SSL3_GET_SERVER_CERTIFICATE:certificate verify failed IO::Socket::INET configuration failed SSL connect attempt failed with unknown error error:14090086:SSL routines:SSL3_GET_SERVER_CERTIFICATE:certificate verify failed
Have you seen this? http://forums.freebsd.org/showpost.php?s=43a23a96ff16a12b4e1be0e805eaf90a&p=229959&postcount=10
Many thanks, I already seen this, but I didn’t figure out to install on ArchLinux. But anyway at least now I have a track.
Thanks
Yes of course. I had to use repo from china to found the library on ArchLinux.
Hello,
Sorry, previous comment was in french.
Thanks for your post. I have an issue with my ddclient on Raspberry. I use the SSL connection to update my dyndns entry, but I receive an error from the library libio-socket-ssl-perl.
I have correctly installed this library as it’s a dependencies.
Any idea ?
Have you tried to reinstall the ssl package?