 In the past, there were more and more – the websites on which a specific action was allowed to run only X times a day. Today, it’s more like geo-blocking – locking out certain users based on their country of origin. However, both variants are based on the same technique: the evaluation of the IP address. In the first case, accesses from an IP address are counted (in addition to cookies) – in the second case, a database is used to evaluate where in the world the user behind a specific IP address is staying. Both locks can often be bypassed by changing the IP address.
There are several ways to change the IP address. To bypass a “count lock”, disconnecting the Internet connection is often enough – e.g. by restarting the router. However, this is no longer enough to circumvent geo blocking mechanisms. Here one must use either a proxy server, which stands in the respective country or use a VPN (Virtual Private Network) with servers in the desired destination country. No doubt – all three variants work – but bring disadvantages. When disconnecting, any downloads that may be running will be aborted. In addition, it takes up to a few minutes to restart the router. On the other hand, good proxy servers or VPNs cost money (in most cases). But there is another possibility that we want to consider today.
How to fake IP address in browser
The other option that I want to show today is “faking” your IP address. So we’re not changing our actual IP address, just telling our web browser to act as if we have a different IP address. The big advantage: changing the address is done in seconds and costs no money. The downside: The solution does not work for all websites and -services. Let’s take a look at it now.
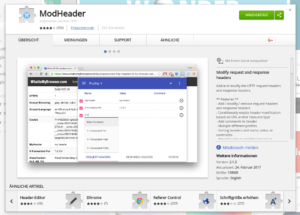
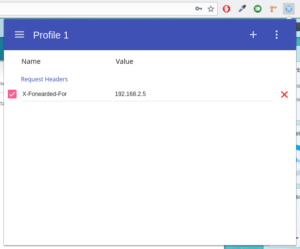
To change the IP address, we use the ModHeader extension from the Google Chrome store. Although I have not tested with Firefox, but the extension Modify Headers should achieve the same effect. After installing the add-on you can open the input mask by clicking on the icon in the toolbar. There we enter the following values:
Header-Name: X-Forwarded-For
Header-Wert: 1.2.3.4
Instead of “1.2.3.4” you can specify the IP address of your choice. With a click on the blue check mark at the beginning of the line you can activate or deactivate the “IP switching”.
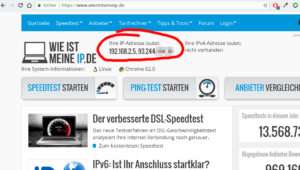
A quick test on an IP address test page (see screenshot) shows that the web server is taking over the IP address just entered as our public IP address. But next to our self-chosen IP address also our real IP address appears. (The pixelated part in the screenshot.) Why this is so, we will look at in the next section.
What happens in background?
By activating the browser extension, the web browser sends the “X-Forwarded-For” header with every request to a web server. This header is typically used by proxy servers to send the user’s IP address to the web server. Otherwise, all users of the proxy server would appear with the same IP address in the server logs. (Proxy servers that should bypass IP locks, by the way, do not send exactly this header!) Many website operators in turn check whether the “X-Forwarded-For” header has been sent with the request and evaluate this instead of (technically) received IP address. And that’s exactly what we use in the implementation shown above.
At the same time, however, the functionality also reveals the weakness of this solution. This only works if the website operator really prefers the “X-Forwarded-For” header over the real IP address. However, in my experience, this is the case in just about every other website I’ve tested this way.
Finally, I would like to know if you already know and use this kind of “IP obfuscation”. Furthermore, I would be interested to know on which websites you had “success” with this method.


