Today’s article is about how to update DNS entries for domains from Namecheap.com via the Synology DSM function DDNS (Dynamic DNS). Since Namecheap.com is neither available as a provider in Synology DSM, nor do the formerly common intermediary services work, this is only possible with a small workaround. And this is exactly what I would like to show you today.
You need the following things for today’s tutorial:
- A domain at Namecheap.com
- A Synology NAS (or a custom NAS with XPEnology)
- A webserver with PHP support
In the next paragraph we will outline the actual problem again in detail. If you are only interested in the solution, you can skip the following paragraph…
What is the problem with Synology DSN and Namecheap?
Namecheap provides a url/web service that you can call to set a DNS record with an IP passed in the call. So far nothing special. Synology DSM on the other hand offers the possibility to connect such web services in the menu “External Access -> DDNS”. Synolgy provides a list of predefined services as well as the possibility to configure your own services/providers. What is the crux of the matter?
Namecheap.com is not one of the predefined services, nor does it manage to update via setting up a custom service. This is due to the fact that Synology does offer the option to store custom service providers, but expects them to respond with specific messages when an update or error occurs. And this is exactly what Namecheap.com does not do. The responses from the Namecheap update service do not match the values Synology expects. Result? Synology indicates that the DNS update was not successful and leaves several error messages in the notification service…
Namecheap DDNS Updates – the solution
To solve the dilemma, we place a small PHP script between Synology DSM and the Namecheap.com-DynDNS webservice. The PHP script receives the DNS updates from Synology, forwards them to Namecheap.com, receives the responses from Namecheap, translates the responses into a format that Synology DSM understands and sends the responses back to Synology then.
Step 1 – The PHP script
First you need to place the following PHP script on any web server. Only two things are important here. The web server must be reachable from your Synology system and the web server must be able to reach the Namecheap.com service (ergo the Internet). It doesn’t matter if you use a free, a paid, a cloud or a locally hosted webserver.
<?php
try {
        $url = 'https://dynamicdns.park-your-domain.com/update?host='.$_GET['host'].'&domain='.$_GET['domain'].'&password='.$_GET['password'].'&ip='.$_GET['ip'];
        $req = curl_init();
        curl_setopt($req, CURLOPT_URL, $url);
        curl_setopt($req, CURLOPT_RETURNTRANSFER, true);
        curl_setopt($ch, CURLOPT_HTTPHEADER, array('Content-type: text/xml'));
        $res = curl_exec($req);
        curl_close($req);
        $xml = new SimpleXMLElement(trim(str_replace("encoding=\"utf-16\"","",$res)));
        if ($xml->ErrCount > 0) {
                $error = $xml->errors[0]->Err1;
                if (strcmp($error, "Domain name not found") === 0) {
                        echo "nohost";
                } elseif (strcmp($error, "Passwords do not match") === 0) {
                        echo "badauth";
                } elseif (strcmp($error, "No Records updated. A record not Found;") === 0) {
                        echo "nohost";
                } else {
                   echo "911 [".$error."]";
                }
        } else {
                echo "good";
        }
} catch (Exception $e) {
    echo "911 [".$e->getMessage()."]";
}
To make the following steps more understandable, we assume that we have created the script under the name dns-proxy.php and that the script is accessible via https://mein-server.de/dns-proxy.php.
Step 2 – Activate DynDNS on Namecheap.com
If not already done, you have to activate the DynDNS function on Namecheap for the desired target domain. To do this, log in to Namecheap.com, go to “Domain List”, select the domain (for our example “my-domain.com”), click on “Manage” and then on “Advanced DNS”.

Here we now create a subdomain. For my example I call it “homebase”, set the type to A-Record and the IP to 0.0.0.0. (The main thing is that it contains an IP. This will be overwritten with our dynamic IP later anyway) With this entry we can later point the domain “homebase.my-domain.com” to the IP address of the Synology.

Second we have to activate the DDNS service. This can be done in the same menu area at the bottom of the page. Check the box as shown in the screenshot and then write down/remember/copy the DynDNS password.
Step 3 – Add Namecheap to Synology DDNS
Now we just have to setup the call of our PHP script in the Synology DSM. To do this, we log in to the DSM, open the Control Panel and go to the “External Access” section and there to the “DDNS” tab.

There we click on “Customize Provider” to add our PHP script as a new provider. We name the provider “Namecheap” and add the following url. (Of course you replace the “mein-server.de/dns-proxy.php”-part with the name of your webserver and your script.)
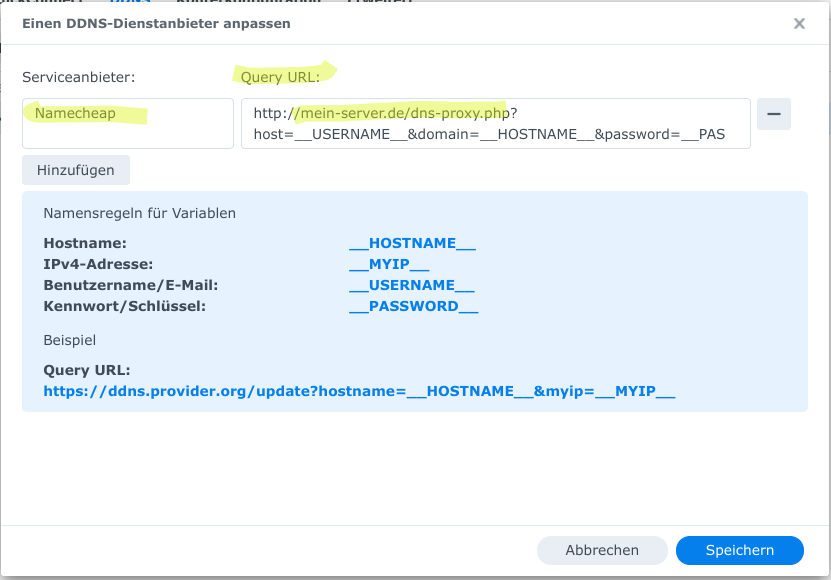
http://mein-server.de/dns-proxy.php?host=__USERNAME__&domain=__HOSTNAME__&password=__PASSWORD__&ip=__MYIP__
Then save the provider and click on Add. Now select “*Namecheap” as provider. (The * indicates self-created providers) and enter the data as shown in the following screenshot.
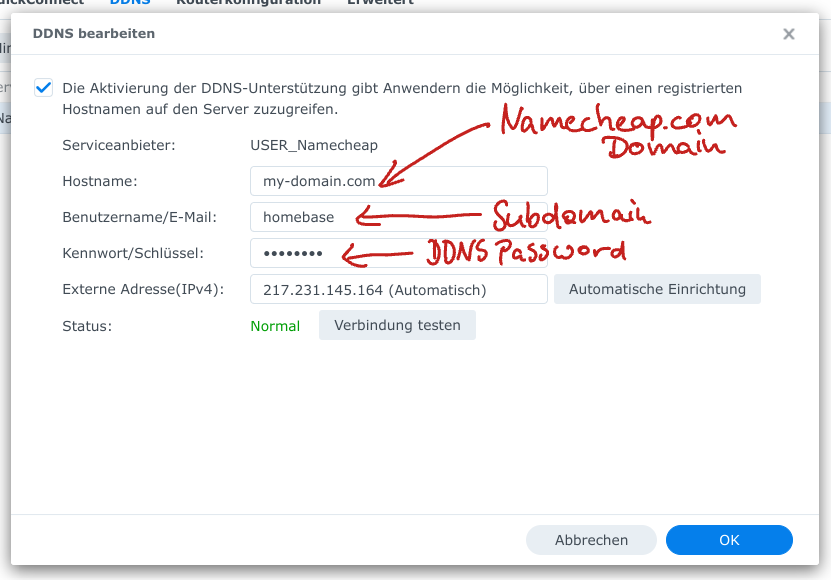
As host you enter your Namecheap domain. As username enter the subdomain and as password the Namecheap.com-DynDNS password you created in step 2.
Now click “Test connection”, be happy about a positive result and save the configuration. That’s it! If you have any questions, feel free to write me a comment here in the blog…


Thx your help
It work on my dsm7
I looking for namecheap dns long times
I more Q!
My Ds209 DSM4.2 connot use
Could you write some code for dms task